Minimal Wiki on a Raspberry Pi
I like to take notes when reading or working at home. DokuWiki is a simple system that can be set up on a server on the LAN. This can be very useful for a small team working together, or at home (also a small team - hopefully one that works together too :-) ). At home, I installed DokuWiki on a Raspberry Pi server - and found a manual installation easier than using the system package.
Installation
On Debian-based systems such as Raspberry Pi OS, the dokuwiki apt package has been known to not work without some manual interventions.
The following procedure should be more reliable, at least it worked well enough for me.
Install apache webserver
Install apache with some required PHP packages:
sudo apt install apache2
sudo apt install php libapache2-mod-php
sudo apt install php-gd php-json php-xml php-mbstring
Check that the server is running
systemctl status apache2
and/or
wget http://127.0.0.1
Install DokuWiki
cd /var/www/html
sudo wget https://download.dokuwiki.org/src/dokuwiki/dokuwiki-stable.tgz
sudo tar -xzf dokuwiki-stable.tgz
sudo chown -R www-data:www-data /var/www/html/dokuwiki
This will extract a directory named dokuwiki-2025-05-14b or something similar.
Rename it to be more convenient to work with:
sudo mv dokuwiki-2025-05-14b dokuwiki
Set permissions on all the files, recursively:
sudo chown -R www-data:www-data /var/www/html/dokuwiki
Update apache configuration
sudo nano /etc/apache2/sites-available/000-default.conf
Add the following before the closing tag </VirtualHost>
Alias /dokuwiki /var/www/html/dokuwiki
<Directory /var/www/html/dokuwiki>
    Options FollowSymLinks
    AllowOverride All
    Require all granted
</Directory>
If you have a separate config file for DokuWiki (e.g., /etc/apache2/conf-available/dokuwiki.conf), disable it:
sudo a2disconf dokuwiki
Run the PHP install script (replace the server name or IP address instead as needed)
http://rpi-server.local/dokuwiki/install.php
Remove the install script, as it’s no longer needed, and restart apache.
sudo rm /var/www/html/dokuwiki/install.php
sudo systemctl restart apache2
Editing pages
How to work with DokiWiki pages is very well explained in the manual.
Focus first on how to create, edit and delete a simple text page.
TIP
The manual recommends to create new pages by adding a link to a non-existing page in an existing page, save the page and then click the link. I find it more convenient to search for a page that does not exist: Then you will get a link to create a new page directly (without having to edit any page first).
Combined with name spaces, this is really nifty.
An example:
- Search for
ejner:todo - Assuming the search finds no matching page, you get a link to create the page
todoin the name spaceejner.
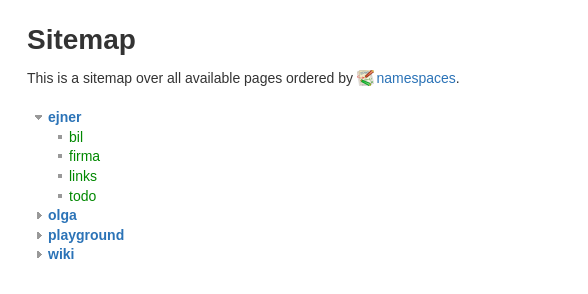
In the Sitemap, the name spaces are displayed nicely:
Later figure out how to edit headings, lists and tables as needed.
Backup
For a DokuWiki installation, these directories needs to be backed up:
| Directory | Purpose |
|---|---|
/var/www/html/dokuwiki/data/ |
Wiki pages, media, metadata, and cache |
/var/www/html/dokuwiki/conf/ |
Configuration files |
/var/www/html/dokuwiki/lib/plugins/ |
Custom or third-party plugins |
/var/www/html/dokuwiki/lib/tpl/ |
Custom themes (if any) |
For my purposes, a nightly backup is sufficient.
I’ll keep the backup on a permanently mounted USB stick.
A simple cron job should be fine for this purpose.
Daily backup with cron
To mount the USB stick at startup:
- Create a directory for mounting
$ mkdir /media/backups
- Get the UUID of the USB device
$ sudo blkid /dev/sda1
# sample output:
/dev/sda1: UUID="1234-5678-90ab-cdef" TYPE="ext4"
-
Add line for the device to fstab
Add this line to /etc/fstab (replace the UUID with the one found above)
UUID=1234-5678-90ab-cdef /media/backups ext4 defaults,nofail,user 0 2
-
Crontab entry
Edit your crontab
sudo crontab -e
Add this line
0 2 * * * tar -czvf /media/backups/dokuwiki_backup_$(date +\%Y-\%m-\%d).tar.gz /var/www/html/dokuwiki/data /var/www/html/dokuwiki/conf /var/www/html/dokuwiki/lib/plugins /var/www/html/dokuwiki/lib/tpl
Test the backup
To test that the backup works:
- Extract the backup tarball to the original location:
$ sudo tar -xzvf dokuwiki_backup.tar.gz -C /
- Set correct permissions
$ sudo chown -R www-data:www-data /var/www/html/dokuwiki
- Inspect the site to see that the pages are there
Tags: FOSS , productivity